Uniflite Salty Pup Refit
-
Bodofish

- Vice Admiral Three Stars
- Posts: 5407
- Joined: Sun Apr 29, 2007 12:59 pm
- Location: Woodinville
- Contact:
Re: Uniflite Salty Pup Refit
If it's not the gel coat, it's probably one of the mono urethane's and that stuff is just plain old hard!!!! Most of them guaranty no wax for ten years, above or below the WL. So hard most water born critters can't get a hold of it.
Build a man a fire and he's warm for the night. Light a man on fire and he's warm the rest of his life!
-
Gisteppo

- Commodore
- Posts: 1016
- Joined: Fri Jun 22, 2007 11:26 am
- Location: Lake Spokane (Long)
- Contact:
Re: Uniflite Salty Pup Refit
Yes! Shop time!
There's a bunch of work that was done that doesn't translate to photos well (rebuilding seacocks, planning and sketching details, etc), but some work with a visual impact was done, and hopefully done right.
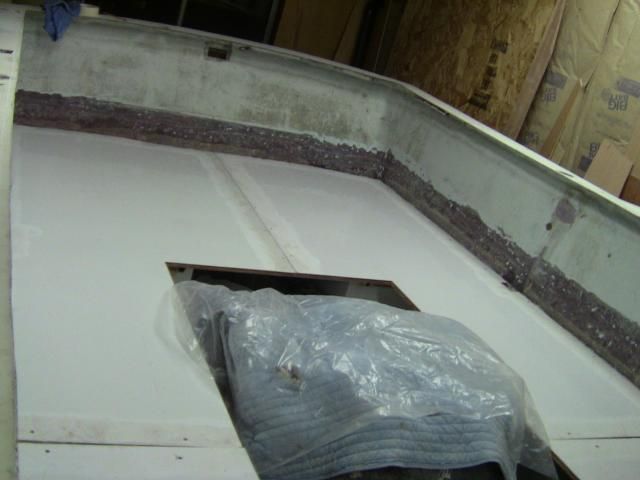
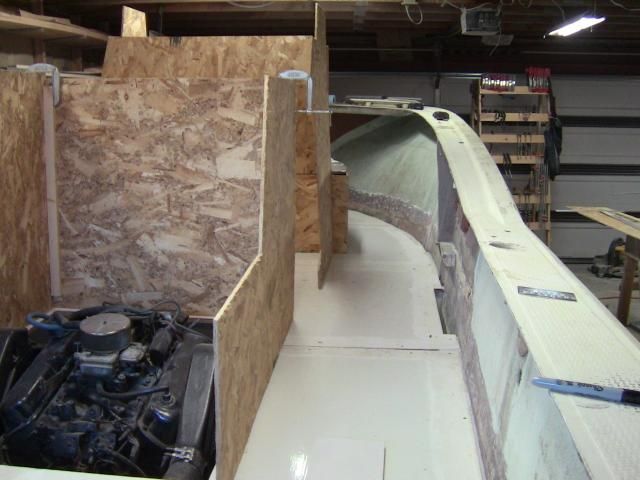
Got the rest of the sole panels set up and mocked in, then did some detail work on trimming them out.
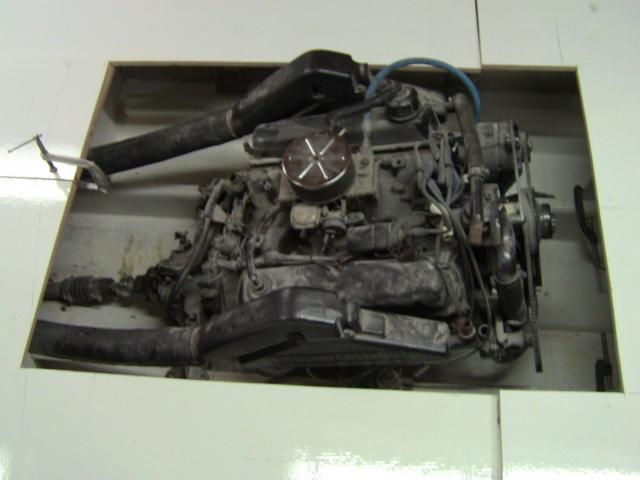
Opted to go for a 34" x 48" hole for the engine.
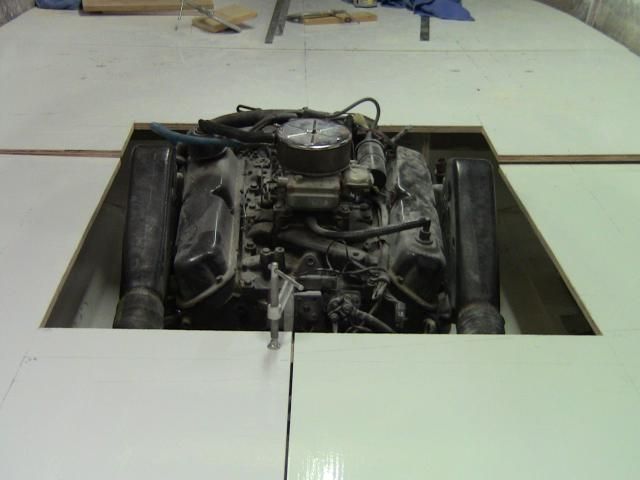
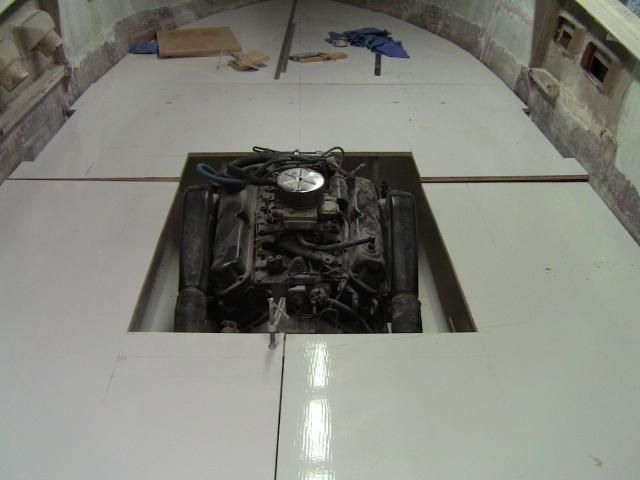
That gives me 4" on either side for doing plugs and tuneups, manifolds, etc. You can also see the slits against the hull sides, those are going to be intake air plenums from the side vents. They look small, but I took the vent area of the dorade vents, then added a bit, and cut those so that they're larger than the smallest portion of the air's path. We want a cool, well vented engine room in this thing.
The length was settled on because there will be a seat over the engine, and the cover will be over 4' long. Why not have lots of space to do transmission work, shaft adjustment, and room for getting at the pulleys?
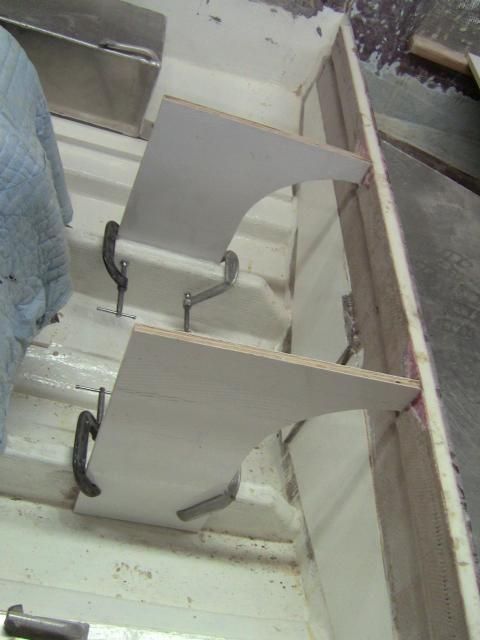
Because of the layout, the sole isn't particularly well supported in these boats as designed. They used solid glass and VERY thick to deal with the span. I'm going much lighter, so a little support was in order. These braces are glued to the stringers and the main bulkhead, and will support the sole under the helmsman's feet, as well as add strength for the walkways around the engine. Some additional bracing in the form of deep cleats will wrap around the engine as a dam for water/noise, support for the sole, and a landing for the engine cover.
Today hopefully some more details, pick up some bits from the House of Hose, and she might just have a sole before Thanksgiving!
E
There's a bunch of work that was done that doesn't translate to photos well (rebuilding seacocks, planning and sketching details, etc), but some work with a visual impact was done, and hopefully done right.
Got the rest of the sole panels set up and mocked in, then did some detail work on trimming them out.
Opted to go for a 34" x 48" hole for the engine.


That gives me 4" on either side for doing plugs and tuneups, manifolds, etc. You can also see the slits against the hull sides, those are going to be intake air plenums from the side vents. They look small, but I took the vent area of the dorade vents, then added a bit, and cut those so that they're larger than the smallest portion of the air's path. We want a cool, well vented engine room in this thing.
The length was settled on because there will be a seat over the engine, and the cover will be over 4' long. Why not have lots of space to do transmission work, shaft adjustment, and room for getting at the pulleys?

Because of the layout, the sole isn't particularly well supported in these boats as designed. They used solid glass and VERY thick to deal with the span. I'm going much lighter, so a little support was in order. These braces are glued to the stringers and the main bulkhead, and will support the sole under the helmsman's feet, as well as add strength for the walkways around the engine. Some additional bracing in the form of deep cleats will wrap around the engine as a dam for water/noise, support for the sole, and a landing for the engine cover.

Today hopefully some more details, pick up some bits from the House of Hose, and she might just have a sole before Thanksgiving!
E
-
Gisteppo
- Commodore
- Posts: 1016
- Joined: Fri Jun 22, 2007 11:26 am
- Location: Lake Spokane (Long)
- Contact:
Re: Uniflite Salty Pup Refit
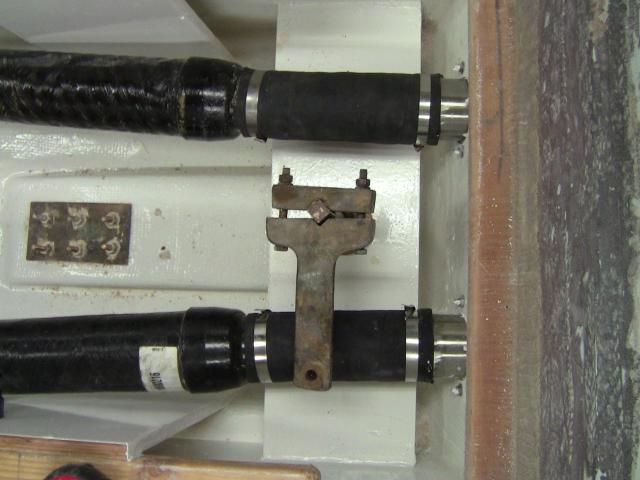
Well I got almost all the rigging I wanted to do finished up.
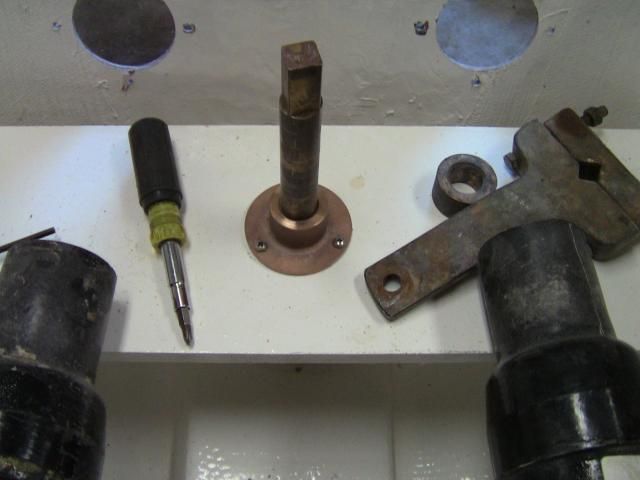
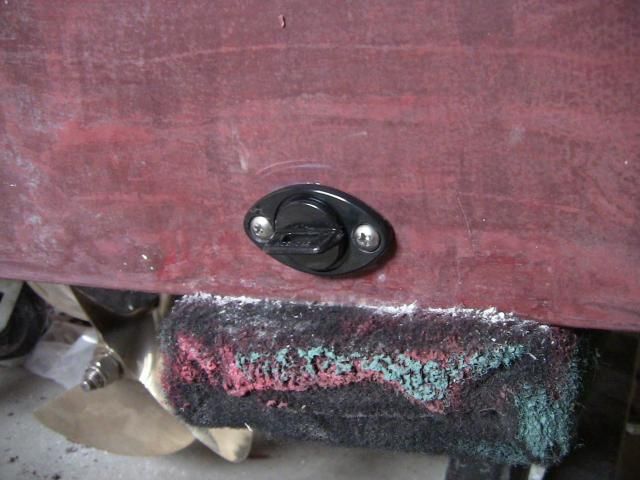
Clamping block for the steering is in place, along with the garboard drain plug:
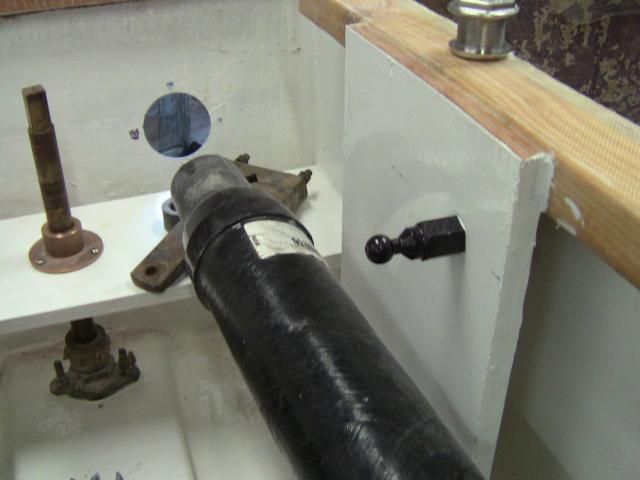
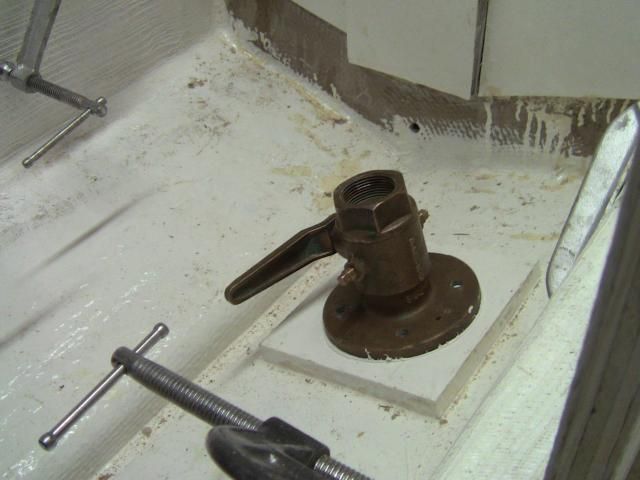
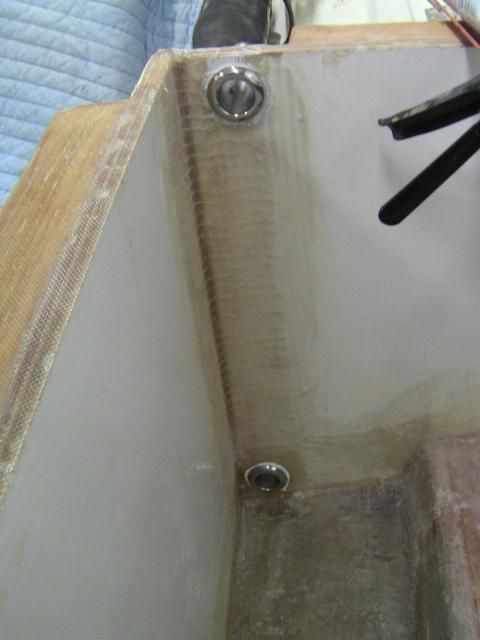
Seacocks are in:
Didn't screw around with the thru-hulls on this thing, real Perko bronze 1-1/4" seacocks, freshly rebuilt:
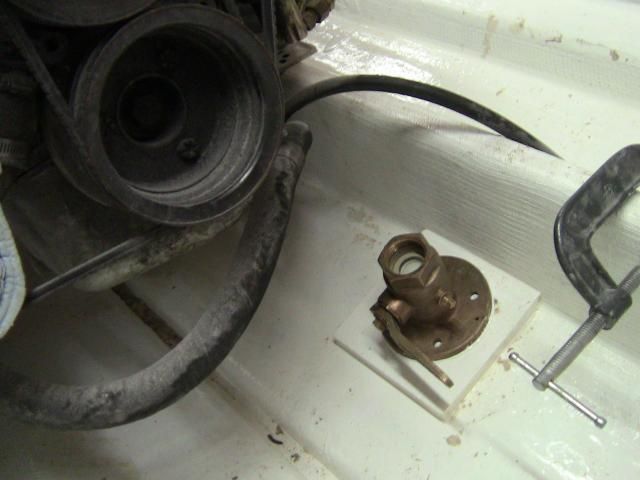
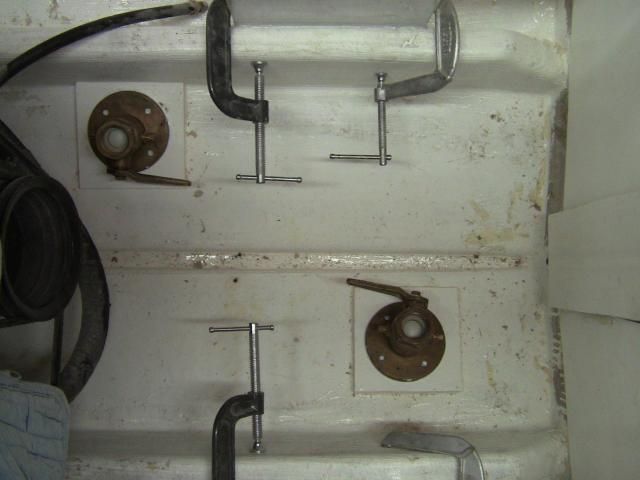
Ballast tanks have their fittings in place:
I'm having a fight, however, with the rudder bushing. It's something like 1° - 2° off of the vertical plane. It is *just* barely off of the line, and binds the rudder when tightened down. Gonna have to screw with it a bit to get it aligned.
Next need some parts for the fuel tanks, rig those up, finish up the exhaust system, and we're gonna be close to laying in the sole...
E
Clamping block for the steering is in place, along with the garboard drain plug:

Seacocks are in:

Didn't screw around with the thru-hulls on this thing, real Perko bronze 1-1/4" seacocks, freshly rebuilt:


Ballast tanks have their fittings in place:


I'm having a fight, however, with the rudder bushing. It's something like 1° - 2° off of the vertical plane. It is *just* barely off of the line, and binds the rudder when tightened down. Gonna have to screw with it a bit to get it aligned.

Next need some parts for the fuel tanks, rig those up, finish up the exhaust system, and we're gonna be close to laying in the sole...
E
-
MarkFromSea

- Admiral
- Posts: 1934
- Joined: Mon Feb 16, 2009 1:38 pm
- Location: Kirkland
Re: Uniflite Salty Pup Refit
This is an awesome project! Anxious to see it in the water!
"Fish Hard and Fish Often!"
-
Gisteppo
- Commodore
- Posts: 1016
- Joined: Fri Jun 22, 2007 11:26 am
- Location: Lake Spokane (Long)
- Contact:
Re: Uniflite Salty Pup Refit
Got a little gap betwixt the kid and the in-laws stopping by before they move to Ecuador for the winter. Out to the shop!
This is some of the last bits of rigging before we glue the sole in. We are now officially water tight!

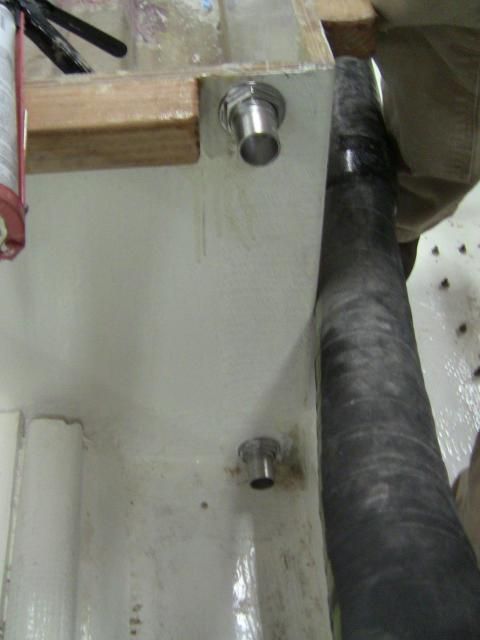
Buttered up and placed the drains for the ballast tanks (fish boxes):
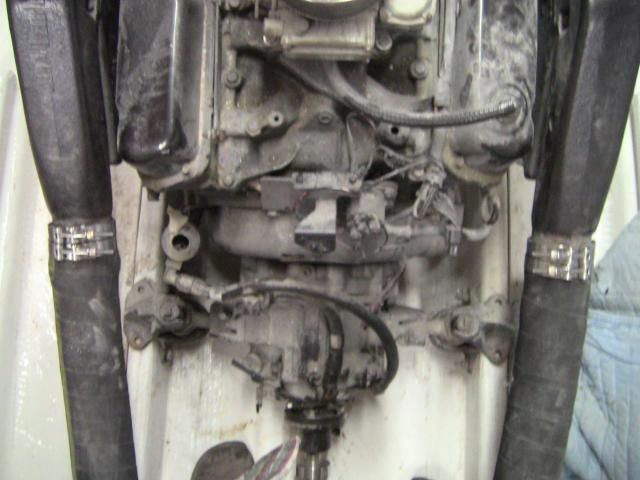
Dual exhaust, because it's what I had. Also there's flappers for noise and water issues, but those won't go on until we are in the drink permanently.
Nice, tidy machinery alley:

And the new tool in the shop...
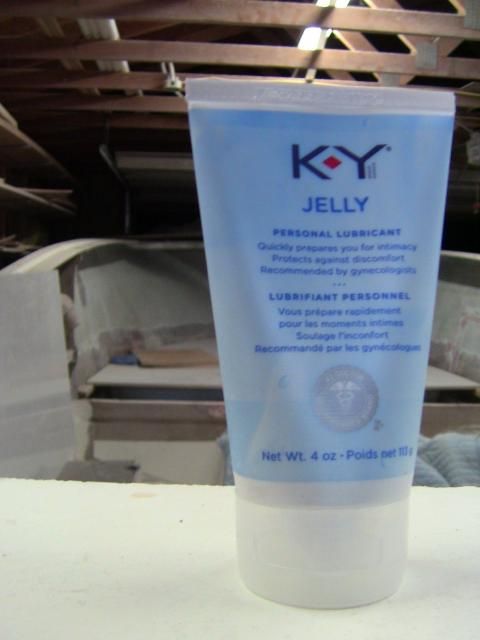
The reason for the KY was the exhaust tips were like 3-1/8" and it was impossible to get the tubing on the tips. So I ground them back a bit (the castings were really rough), and tried soap, oil, etc. Got on the interwebs and found a few people who had used the "personal lubricant" and swore by it. I now completely agree.
The guts are now in place aft. Just need to do the tank fittings, run a little hose, and the sole goes IN!
E
This is some of the last bits of rigging before we glue the sole in. We are now officially water tight!

Buttered up and placed the drains for the ballast tanks (fish boxes):

Dual exhaust, because it's what I had. Also there's flappers for noise and water issues, but those won't go on until we are in the drink permanently.

Nice, tidy machinery alley:

And the new tool in the shop...

The reason for the KY was the exhaust tips were like 3-1/8" and it was impossible to get the tubing on the tips. So I ground them back a bit (the castings were really rough), and tried soap, oil, etc. Got on the interwebs and found a few people who had used the "personal lubricant" and swore by it. I now completely agree.

The guts are now in place aft. Just need to do the tank fittings, run a little hose, and the sole goes IN!
E
-
MarkFromSea
- Admiral
- Posts: 1934
- Joined: Mon Feb 16, 2009 1:38 pm
- Location: Kirkland
Re: Uniflite Salty Pup Refit
Checked your site out...
Looked good!
http://www.stagboatworks.com/?page_id=414" onclick="window.open(this.href);return false;
Looked good!
http://www.stagboatworks.com/?page_id=414" onclick="window.open(this.href);return false;
"Fish Hard and Fish Often!"
-
Gisteppo
- Commodore
- Posts: 1016
- Joined: Fri Jun 22, 2007 11:26 am
- Location: Lake Spokane (Long)
- Contact:
Re: Uniflite Salty Pup Refit
Finally, for the first time since I started this Uniflite project, I hit a timeline goal! More on that later...
Got the details done on the exhaust system, now we have smooth drops and everything is double clamped:
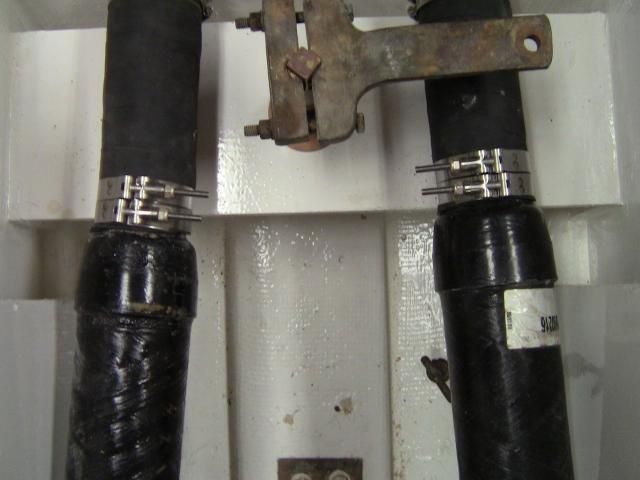
Spendy buggers, but man they cinch up tight.
Next, there was a TON of this:
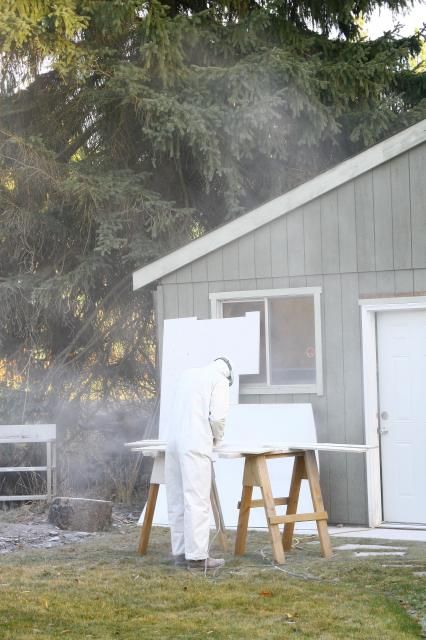
I'm glad Tyvek suits are around, that sure makes the day-long grinding projects easier in the evening, just peel it off, shake it out, and it's ready for tomorrow. Got the edges ground out for tape, and got all the interior contact points ground for a glass-epoxy-glass bond.
Temps were mild today, wife had the kid out playing with his friends, so I stuck myself in the shop. 10A to 11p I was out there, and it was worth it.
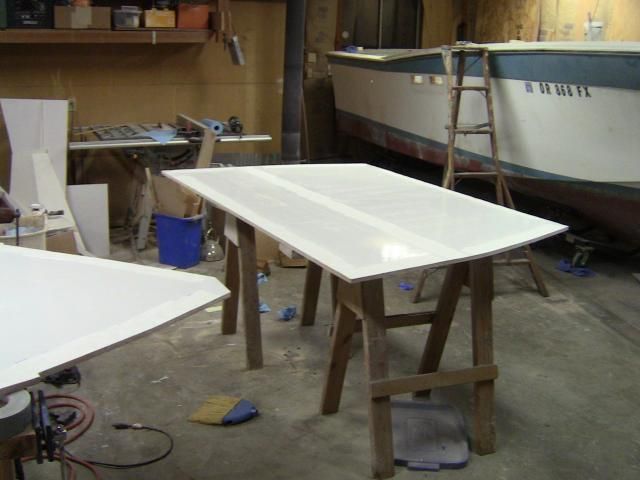
Yeah, that's right. Sole panels are glued in! I told myself this thing won't be floating by the warm season if I don't get the sole panels in before Thanksgiving. A little suffering today and it got done.
At first I wasn't too sure about how I was going to get everything buttoned in (weights on the edges, drywall screws, etc), but when I was cutting apart a section of the old sole to get it out of the way, I found a perfectly clean stainless screw in the fir, under the tape. Having read a few miles of articles on crevice corrosion, I didn't think this was possible, but there was the evidence in the flesh. Moral of the story, it's all glassed and will be taped, but there will be a few stainless fasteners in there too. Belt and suspenders, some say.
Now we have acres upon acres of sole to mess with. I was hoping to get it all taped in, but with highs in the teens and lows in the single digits next week, that's NOT going to happen.

Stepping back at the end of the night, fire crackling in the wood stove, sole finally stuck in place, I got to take a look at her from a little distance. Man I'm looking forward to this boat on the water.
E
Got the details done on the exhaust system, now we have smooth drops and everything is double clamped:


Spendy buggers, but man they cinch up tight.
Next, there was a TON of this:

I'm glad Tyvek suits are around, that sure makes the day-long grinding projects easier in the evening, just peel it off, shake it out, and it's ready for tomorrow. Got the edges ground out for tape, and got all the interior contact points ground for a glass-epoxy-glass bond.

Temps were mild today, wife had the kid out playing with his friends, so I stuck myself in the shop. 10A to 11p I was out there, and it was worth it.

Yeah, that's right. Sole panels are glued in! I told myself this thing won't be floating by the warm season if I don't get the sole panels in before Thanksgiving. A little suffering today and it got done.
At first I wasn't too sure about how I was going to get everything buttoned in (weights on the edges, drywall screws, etc), but when I was cutting apart a section of the old sole to get it out of the way, I found a perfectly clean stainless screw in the fir, under the tape. Having read a few miles of articles on crevice corrosion, I didn't think this was possible, but there was the evidence in the flesh. Moral of the story, it's all glassed and will be taped, but there will be a few stainless fasteners in there too. Belt and suspenders, some say.

Now we have acres upon acres of sole to mess with. I was hoping to get it all taped in, but with highs in the teens and lows in the single digits next week, that's NOT going to happen.

Stepping back at the end of the night, fire crackling in the wood stove, sole finally stuck in place, I got to take a look at her from a little distance. Man I'm looking forward to this boat on the water.

E
-
hewesfisher

- Admiral
- Posts: 1886
- Joined: Sat Apr 28, 2007 8:20 am
- Location: Spangle, WA
Re: Uniflite Salty Pup Refit
Looks great E. Having seen her first hand gives a real appreciation for the expanse of work you're doing. Happy Thanksgiving to you and your family!
Phil
'09 Hewescraft 20' ProV
150hp Merc Optimax
8hp Merc 4-stroke
Raymarine DS600X HD Sounder
Raymarine a78 MultiFunctionDisplay
Raymarine DownVision
Raymarine SideVision
Baystar Hydraulic Steering
Trollmaster Pro II
Traxstech Fishing System
MotorGuide 75# Thrust Wireless Bow Mount
'09 Hewescraft 20' ProV
150hp Merc Optimax
8hp Merc 4-stroke
Raymarine DS600X HD Sounder
Raymarine a78 MultiFunctionDisplay
Raymarine DownVision
Raymarine SideVision
Baystar Hydraulic Steering
Trollmaster Pro II
Traxstech Fishing System
MotorGuide 75# Thrust Wireless Bow Mount
-
Gisteppo
- Commodore
- Posts: 1016
- Joined: Fri Jun 22, 2007 11:26 am
- Location: Lake Spokane (Long)
- Contact:
Re: Uniflite Salty Pup Refit
Tiny Man took a 4 hour nap today, so it was time for some rapid prototyping with OSB and an air nailer. I was having a hard time figuring out exactly what my console dimensions were going to look like. How deep from the forward seat box to the back of the console, height, steering wheel location in relation, etc etc etc. The only way to get it really nailed down is to mock everything up. So here's how it went;
First things first, the wife's seat (and primary coffin box) needed to be 44" wide and 48" long.
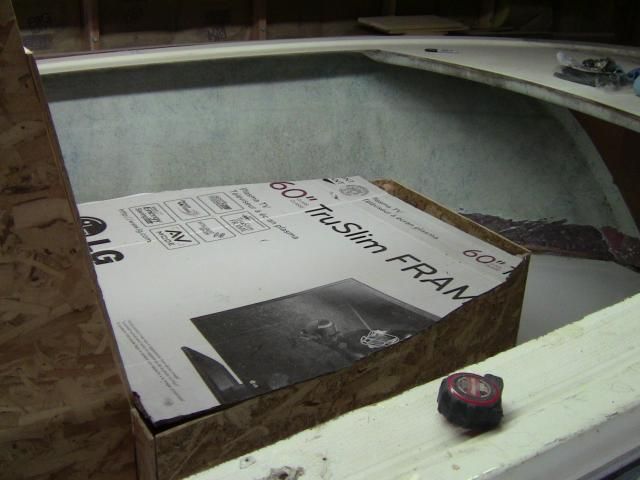
This worked out reasonably well, with a current forward walk-around gap of 12" and the rest over 18".
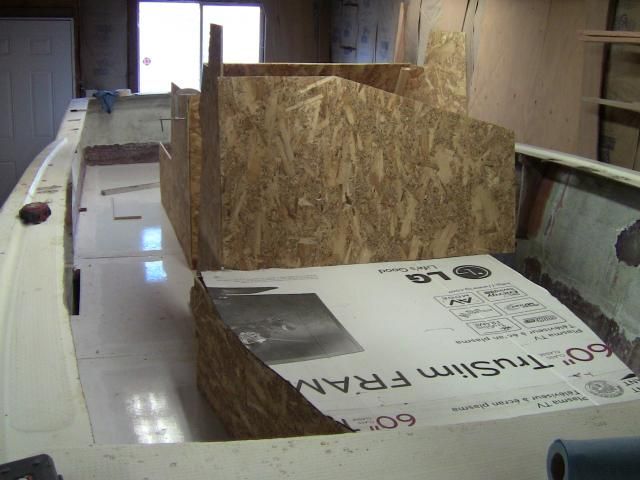
I'm currently thinking of stepping back the console width 3" from the seat box, essentially hiding the legs of the t-top from unsuspecting toes, and preserving at least 18" and more like 20" walkways.
Now we can establish the 18" min between the console lip and the seat box. I think the seat box is still a little too high, mainly because I couldn't find the piece of paper I jotted down the dimensions I had on. It's going to be essentially the same as the Shamrock seats, with a little more pizzazz.
Then we just take a step back and have a look at how well it blends in.
The seat box shape needs a bit more elegance, and a little less height, to look good. Otherwise I think this is going to work out pretty good.
I'm all up for thoughts, especially from those with walk arounds that see flaws or have ideas. Still on the fence about having the bottom of the console jut out into a little footrest or not as well. I like it in the WorldCat boats, but not sure how valuable it is.
E
First things first, the wife's seat (and primary coffin box) needed to be 44" wide and 48" long.

This worked out reasonably well, with a current forward walk-around gap of 12" and the rest over 18".

I'm currently thinking of stepping back the console width 3" from the seat box, essentially hiding the legs of the t-top from unsuspecting toes, and preserving at least 18" and more like 20" walkways.

Now we can establish the 18" min between the console lip and the seat box. I think the seat box is still a little too high, mainly because I couldn't find the piece of paper I jotted down the dimensions I had on. It's going to be essentially the same as the Shamrock seats, with a little more pizzazz.

Then we just take a step back and have a look at how well it blends in.

The seat box shape needs a bit more elegance, and a little less height, to look good. Otherwise I think this is going to work out pretty good.

I'm all up for thoughts, especially from those with walk arounds that see flaws or have ideas. Still on the fence about having the bottom of the console jut out into a little footrest or not as well. I like it in the WorldCat boats, but not sure how valuable it is.
E
-
Gisteppo
- Commodore
- Posts: 1016
- Joined: Fri Jun 22, 2007 11:26 am
- Location: Lake Spokane (Long)
- Contact:
Re: Uniflite Salty Pup Refit
What WHAT? An update?
The seat box shape and size has been finalized:
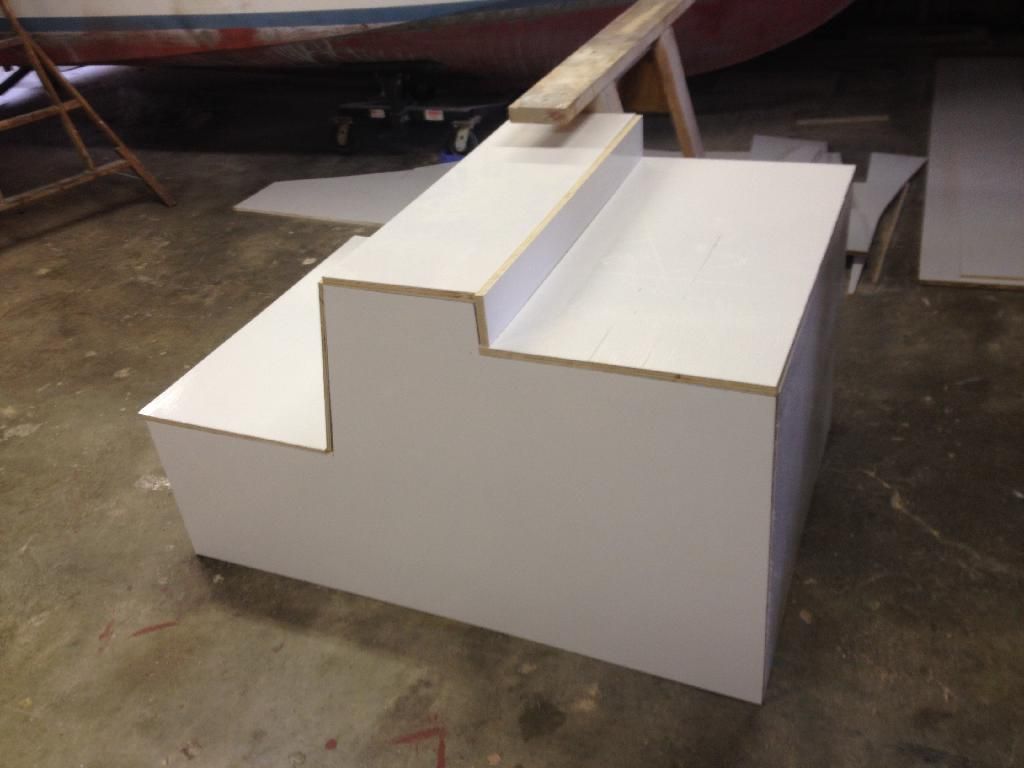
Forward, the seat cushion should end up flush with the top of the box, where cup holders and backrest posts will sit. These will be set up to drain through the side so that no water ends up in the bilge.

Aft seat will fit 2 full sized humans comfortably. No headrest, per-se, but the backrest height is MUCH better than most of the excuses we call back seats in boats.
Time is absolutely of the essence, and I have been mulling over the how and why. What was decided is rather than pulling fillets (which are somewhat strong but require lots of glass), I'd do something for cleating. That left foam or wood. Given that foam and wood both degrade if they get wet, and both are easily protected from degradation with fiberglass, I went with what I had on hand:
Remember, I found fir like this under fiberglass in THIS boat that was still absolutely perfect and smelled good, that hasn't seen the light of day since 1964...
Gluing up as time permits, then a rim around the engine, tape in the floor, and start on the console.
E
The seat box shape and size has been finalized:

Forward, the seat cushion should end up flush with the top of the box, where cup holders and backrest posts will sit. These will be set up to drain through the side so that no water ends up in the bilge.

Aft seat will fit 2 full sized humans comfortably. No headrest, per-se, but the backrest height is MUCH better than most of the excuses we call back seats in boats.

Time is absolutely of the essence, and I have been mulling over the how and why. What was decided is rather than pulling fillets (which are somewhat strong but require lots of glass), I'd do something for cleating. That left foam or wood. Given that foam and wood both degrade if they get wet, and both are easily protected from degradation with fiberglass, I went with what I had on hand:

Remember, I found fir like this under fiberglass in THIS boat that was still absolutely perfect and smelled good, that hasn't seen the light of day since 1964...
Gluing up as time permits, then a rim around the engine, tape in the floor, and start on the console.
E
-
Gisteppo
- Commodore
- Posts: 1016
- Joined: Fri Jun 22, 2007 11:26 am
- Location: Lake Spokane (Long)
- Contact:
Re: Uniflite Salty Pup Refit
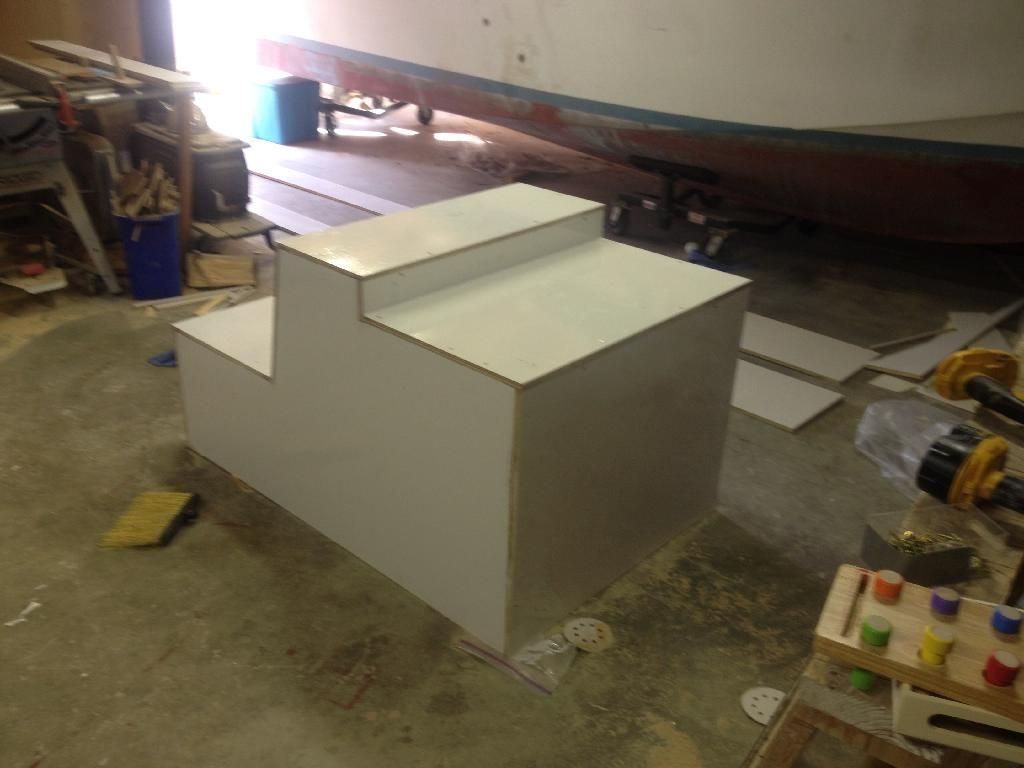
Weather's getting better, a few things got completed, and the wife took The Dude to play this afternoon so off to the shop I went to get itchy and sticky.
Last week I ran out and stuck down my cleat stock so that I could glue/screw today and make faster progress rather than having to wait for things to cure.
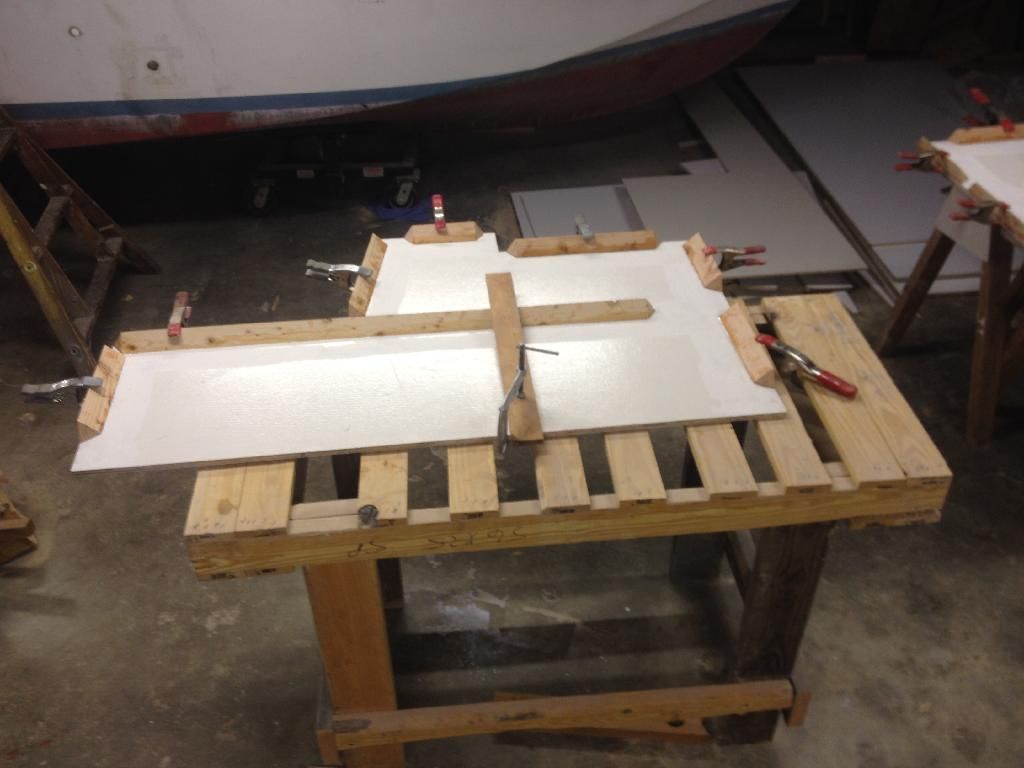
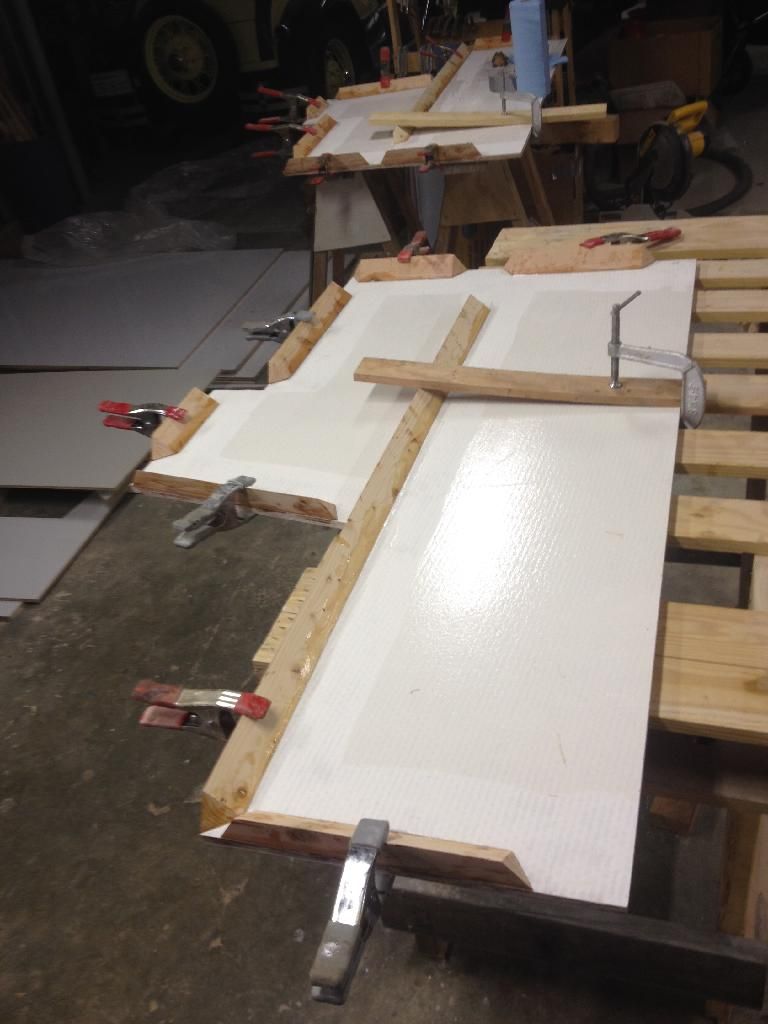
I also had a little glue left over, so I stuck a big, fat base cleat on the engine room sides in preparation for the engine hole to have her bilge water protection.
However, I learned today that I glued the cleats in the wrong position on the front and back. It was supposed to hold the panel *inside* the sides, and instead I made them sit flush. Ugh, have to re-cut two pieces out of new stock to fix the error, and trim up a few others. Make it work, however, and just keep trudging along. This only gets done if you do it.
On went the ends:
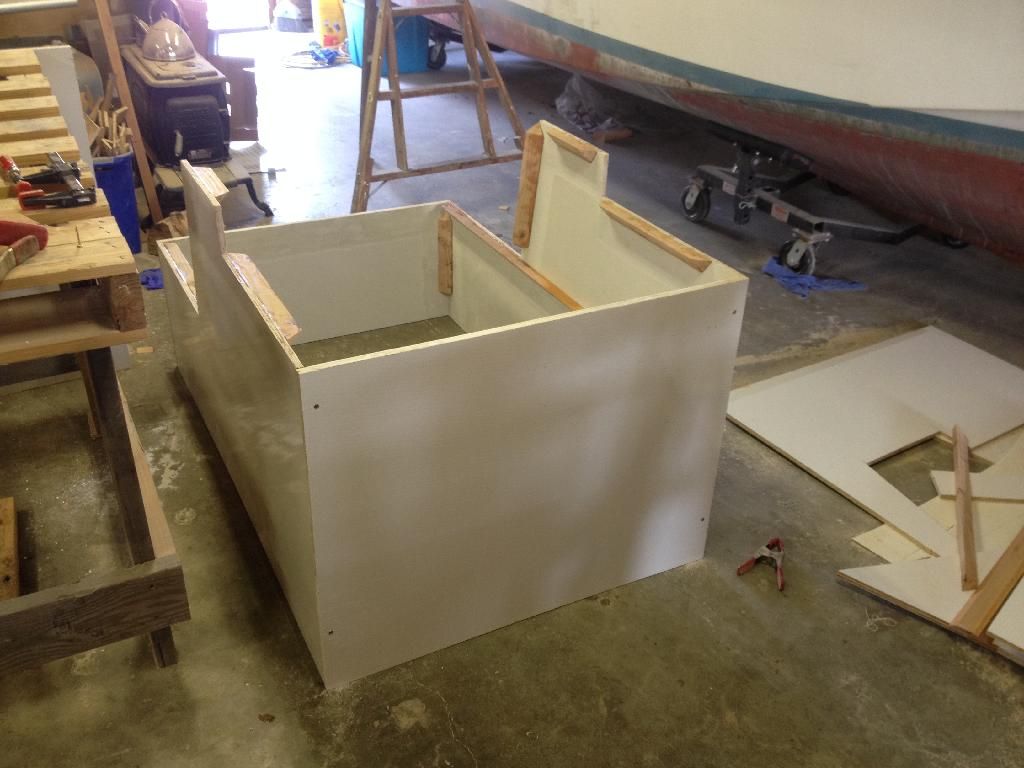
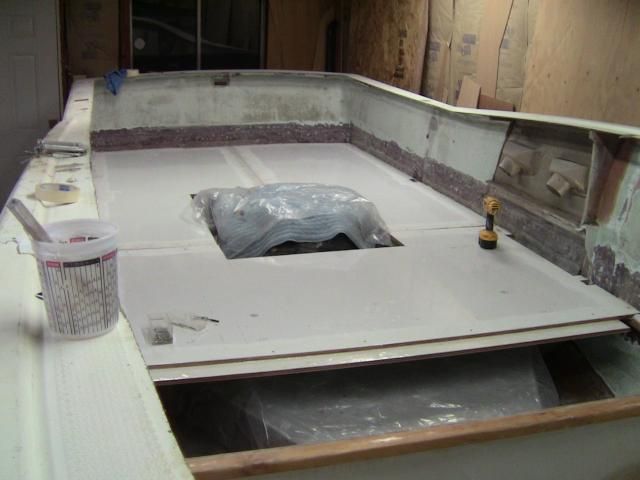
Then drop in the big structural shelf (this squares everything up, makes the cover about twice as strong):

And in this photo you can see the cool side effect of that, it now has a large storage space in the seat box for life jackets and other lightweight stuff. It also allows me to insulate the engine room more efficiently and not have a huge echo chamber above the engine and into the butts of all the occupants.
Next trip to the shop will be to finish the box, then start sorting out the console and side decks, and glue in the rim around the engine. Finish up the seams on the sole, start rigging, stick side decks on it, and plenums for the air intake, and I think I might just stick her in the water for the summer to play with and look for changes that are necessary.
E
Last week I ran out and stuck down my cleat stock so that I could glue/screw today and make faster progress rather than having to wait for things to cure.


I also had a little glue left over, so I stuck a big, fat base cleat on the engine room sides in preparation for the engine hole to have her bilge water protection.

However, I learned today that I glued the cleats in the wrong position on the front and back. It was supposed to hold the panel *inside* the sides, and instead I made them sit flush. Ugh, have to re-cut two pieces out of new stock to fix the error, and trim up a few others. Make it work, however, and just keep trudging along. This only gets done if you do it.
On went the ends:

Then drop in the big structural shelf (this squares everything up, makes the cover about twice as strong):

And in this photo you can see the cool side effect of that, it now has a large storage space in the seat box for life jackets and other lightweight stuff. It also allows me to insulate the engine room more efficiently and not have a huge echo chamber above the engine and into the butts of all the occupants.

Next trip to the shop will be to finish the box, then start sorting out the console and side decks, and glue in the rim around the engine. Finish up the seams on the sole, start rigging, stick side decks on it, and plenums for the air intake, and I think I might just stick her in the water for the summer to play with and look for changes that are necessary.
E
-
Gisteppo
- Commodore
- Posts: 1016
- Joined: Fri Jun 22, 2007 11:26 am
- Location: Lake Spokane (Long)
- Contact:
Re: Uniflite Salty Pup Refit
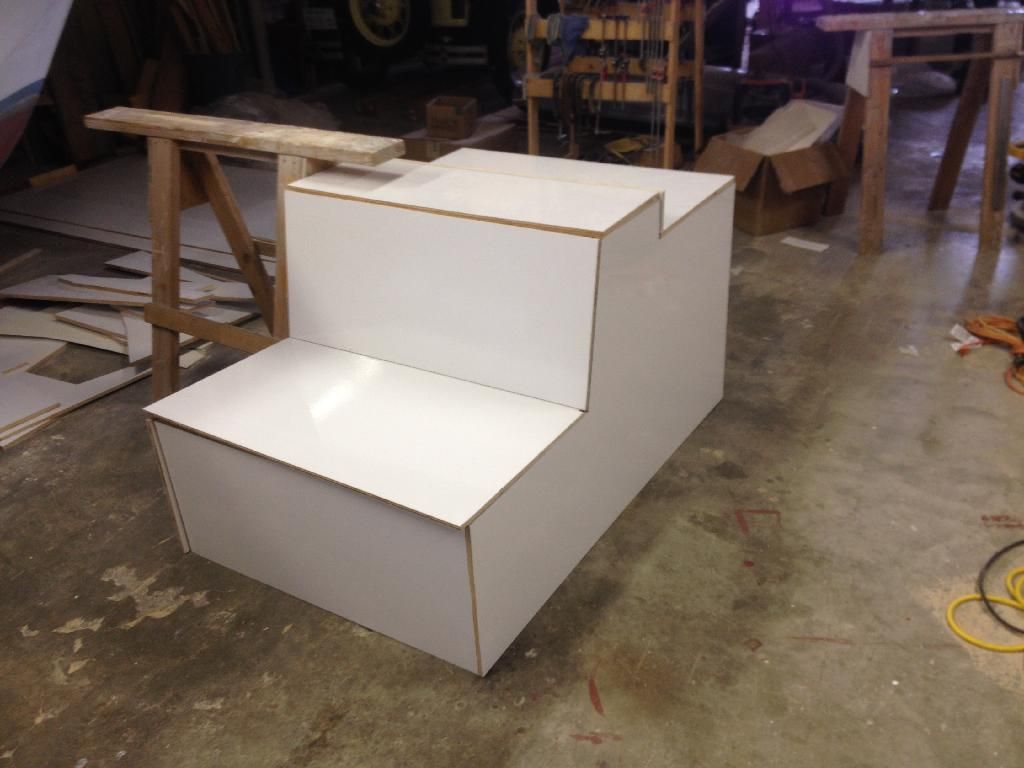
After being gone a week, then working 96 hours one week, then having a bunch of house junk to catch up on, I blew off all the other projects I need to get done (who cares if the hose bib is dripping, right?) and headed to the shop.
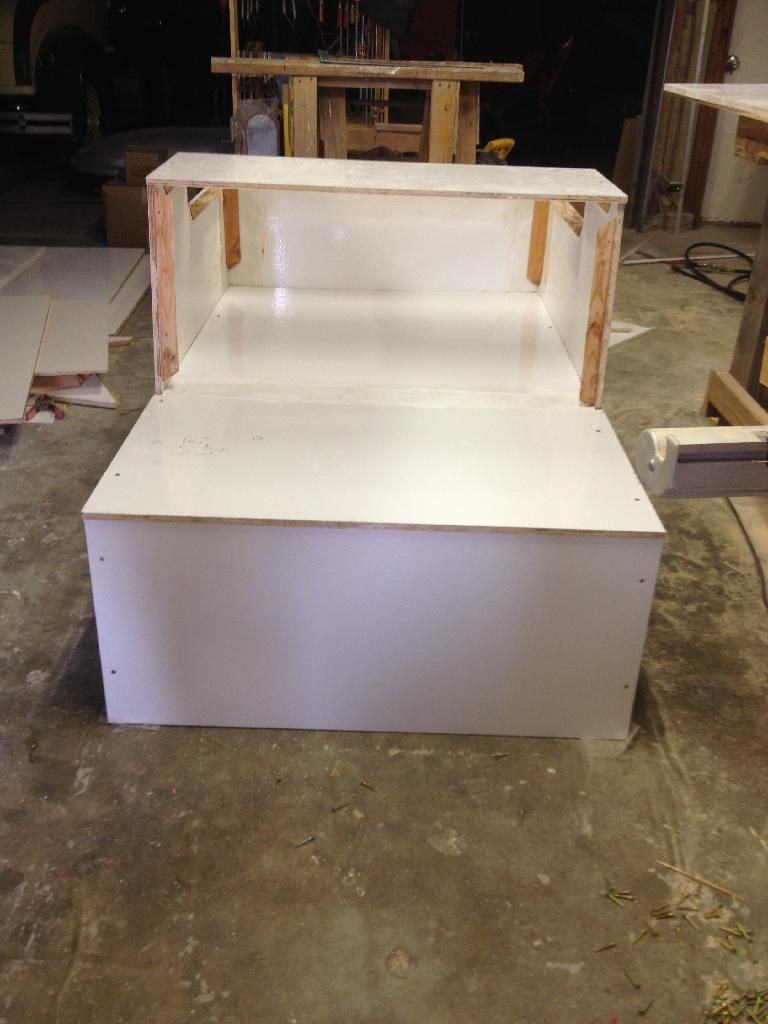
Seat box/engine cover is now assembled!
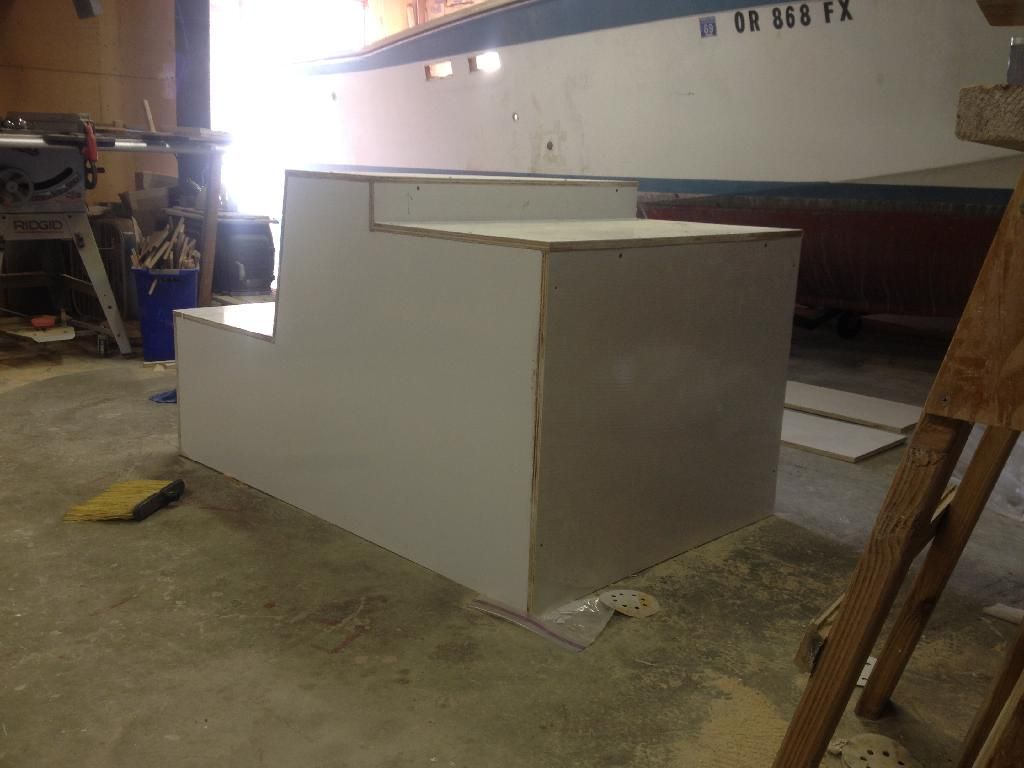
The compartment inside is sealed up tight, ready for a dry hatch door or two to access it. Probably will only house life jackets, an extinguisher, maybe some light tackle, and that kinda junk, don't want it to be excessively heavy to lift when the engine needs to be looked at or serviced.
Cushions will be built at a later date, but the draining cup holders could go on anytime, I suppose. Gotta have priorities in this boat, right?
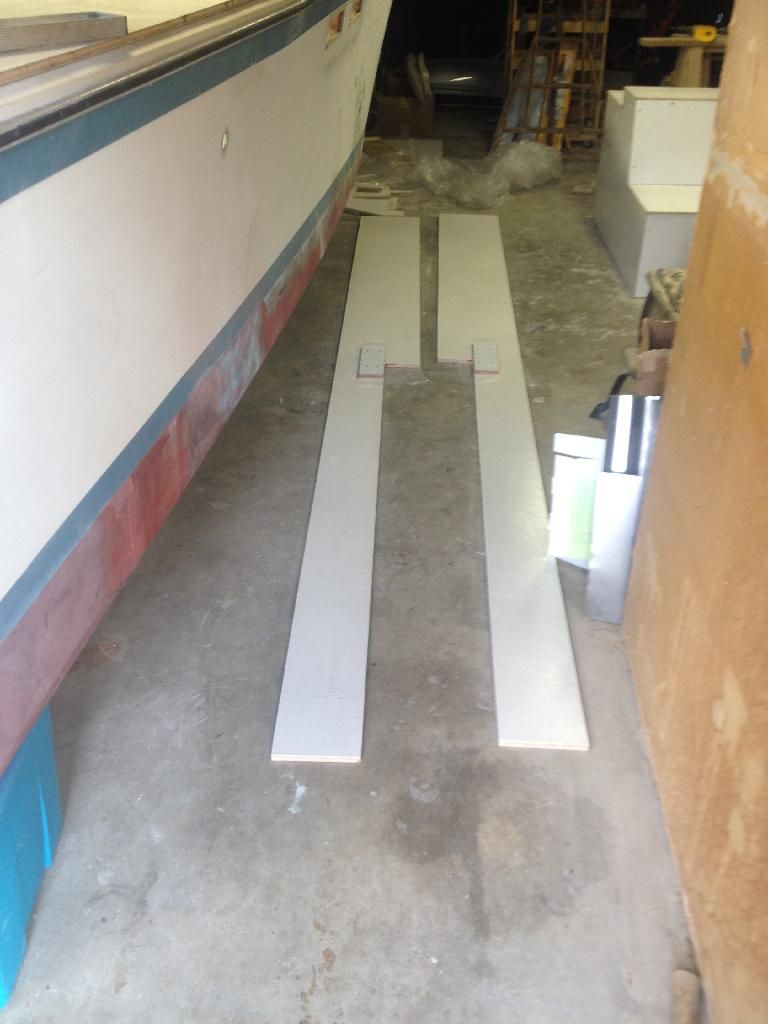
Since the sticky stuff was out, I glued up the blanks for the side decks. 14 feet of 3/4" thick material to cover the arcs formed by the Carolina style split sheer. This should be one helluva lot stiffer than the 2 layers of roving that constitute the existing side decks. These will be later framed out with stock that runs to the sole in several places, creating plenums for the engine room vents, covers for the fuel hoses, and other random rigging bits.
You'll note there's butt blocks on there, and some may ask why they don't go the full width. This gap is to allow a large gluing surface to the existing toerail. Should be a nice strong gluing point that integrates the new decks to the existing structural joint from deck to hull. Uniflite fiberglassed this joint from the factory, so why mess with it?
Also did the last of the detail sanding so I can start taping in the sole. I suppose this is all wishful thinking of being able to get the console in and start rigging her for a little summertime fun here in Spokane. Lots of ground to cover, but maybe, just maybe, by the 4th we can get her wet and see what we have to work with.

E
Seat box/engine cover is now assembled!

The compartment inside is sealed up tight, ready for a dry hatch door or two to access it. Probably will only house life jackets, an extinguisher, maybe some light tackle, and that kinda junk, don't want it to be excessively heavy to lift when the engine needs to be looked at or serviced.
Cushions will be built at a later date, but the draining cup holders could go on anytime, I suppose. Gotta have priorities in this boat, right?

Since the sticky stuff was out, I glued up the blanks for the side decks. 14 feet of 3/4" thick material to cover the arcs formed by the Carolina style split sheer. This should be one helluva lot stiffer than the 2 layers of roving that constitute the existing side decks. These will be later framed out with stock that runs to the sole in several places, creating plenums for the engine room vents, covers for the fuel hoses, and other random rigging bits.
You'll note there's butt blocks on there, and some may ask why they don't go the full width. This gap is to allow a large gluing surface to the existing toerail. Should be a nice strong gluing point that integrates the new decks to the existing structural joint from deck to hull. Uniflite fiberglassed this joint from the factory, so why mess with it?

Also did the last of the detail sanding so I can start taping in the sole. I suppose this is all wishful thinking of being able to get the console in and start rigging her for a little summertime fun here in Spokane. Lots of ground to cover, but maybe, just maybe, by the 4th we can get her wet and see what we have to work with.

E
-
MarkFromSea
- Admiral
- Posts: 1934
- Joined: Mon Feb 16, 2009 1:38 pm
- Location: Kirkland
Re: Uniflite Salty Pup Refit
Careful with those Large vents. If not done correctly, they may let in as much water as air.
-
Gisteppo
- Commodore
- Posts: 1016
- Joined: Fri Jun 22, 2007 11:26 am
- Location: Lake Spokane (Long)
- Contact:
Re: Uniflite Salty Pup Refit
The large vents have dorade boxes that are provided from the factory prevent just that. The water actually has to physically enter the vent, then rise to the level above the top of the vent where the box has smaller holes, then go down through the plenums, and make it into the bilges. Definitely went the safe route on the engine room venting.
E
E
-
Gisteppo
- Commodore
- Posts: 1016
- Joined: Fri Jun 22, 2007 11:26 am
- Location: Lake Spokane (Long)
- Contact:
Re: Uniflite Salty Pup Refit
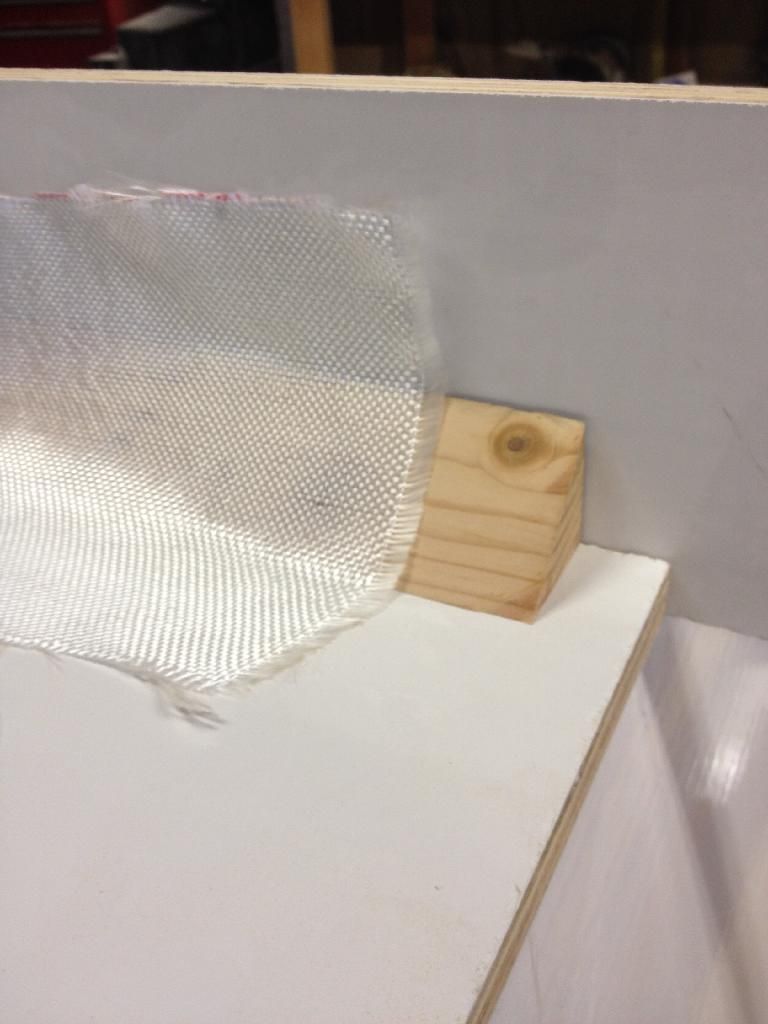
Two things I need to get out there right off the bat.
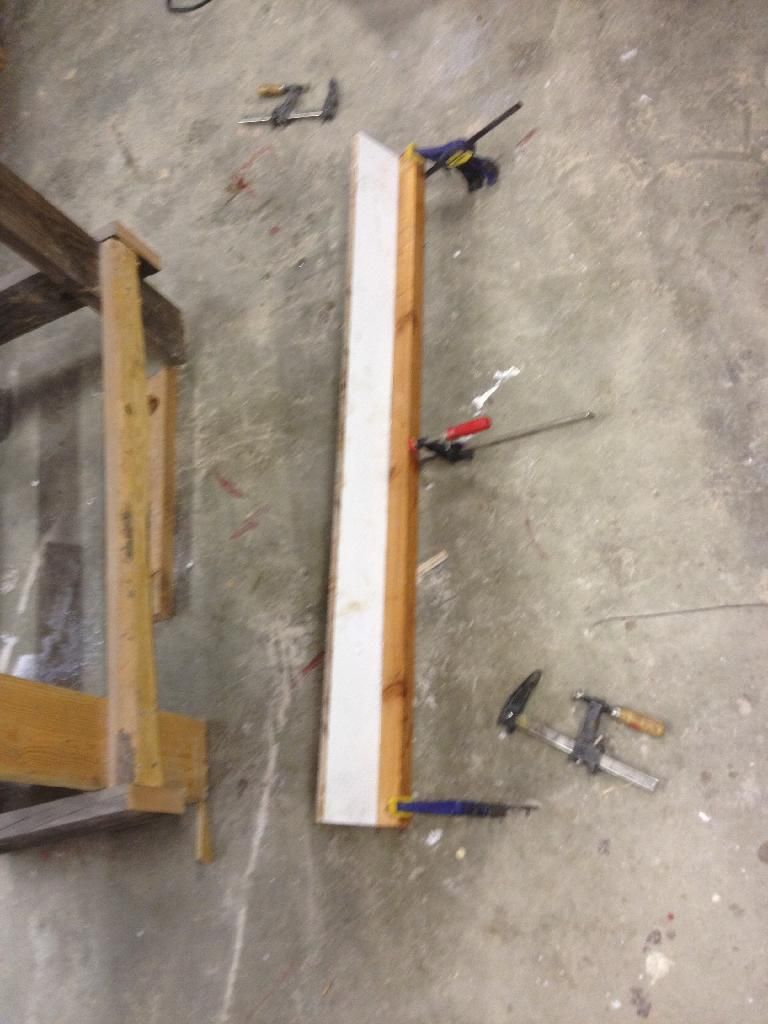
#1: For those that say wood will rot in *well built* boats, and that stainless will die from crevice corrosion when glassed in place, you may now suck it:
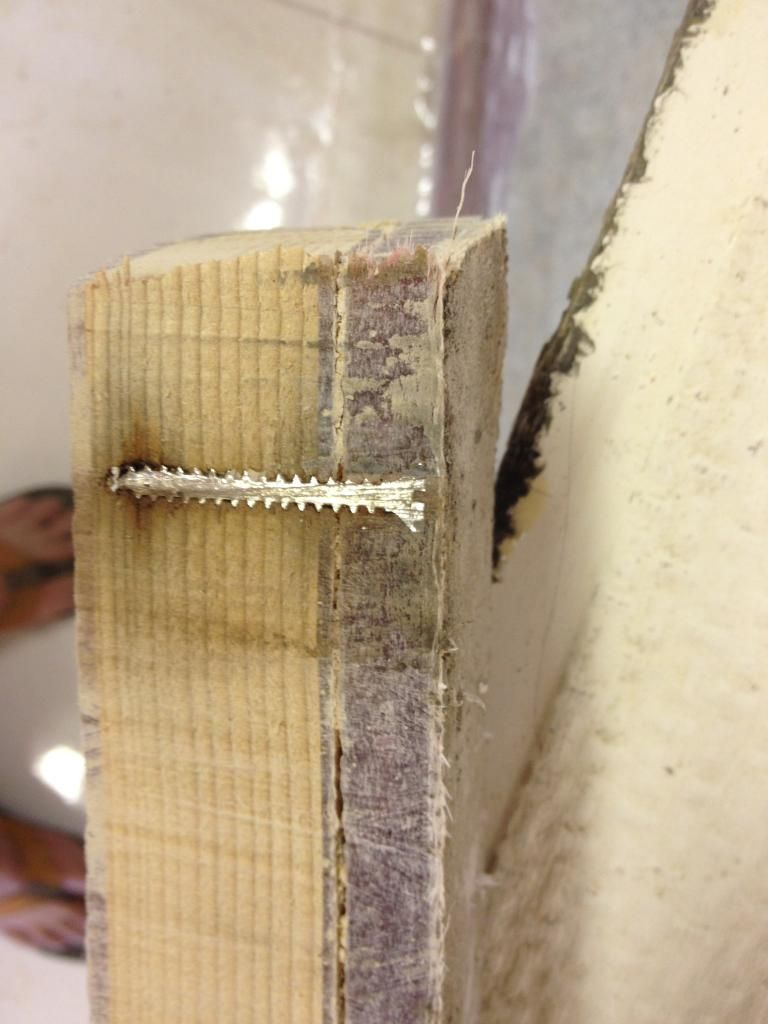
That screw was buried in that 2x stock in 1963. It is still perfect metal, and nil rot for her age.
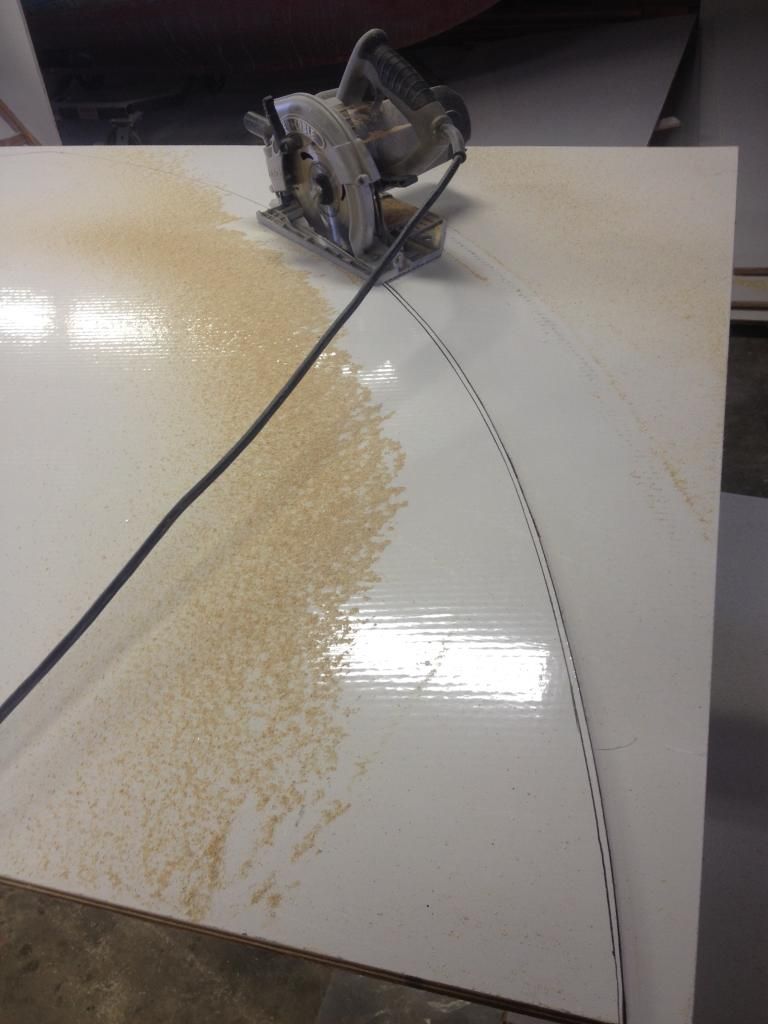
#2: I often get people asking how to cut smooth curves. Set your circular saw to just a hair deeper than the material, and you'd be shocked at how tight of a curve you can knock out. This is 3/4" thick stock, and wasn't even as tight as you can cut with this normal sized saw:
Okay, enough ranting.
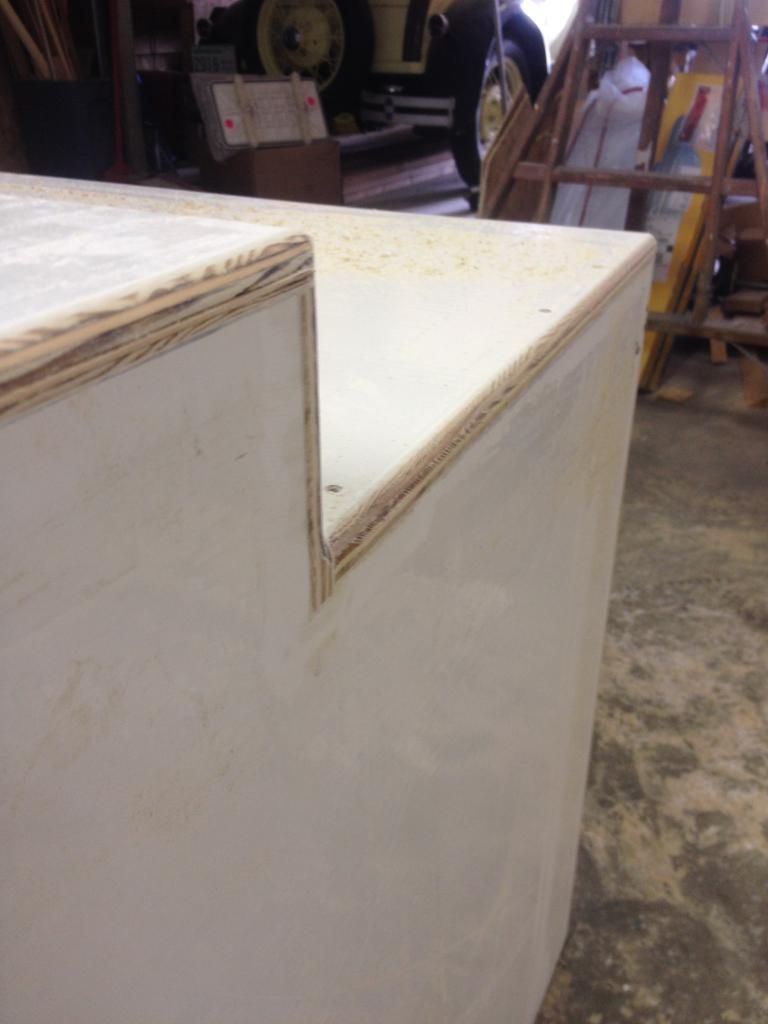
Got out the router and shaped the seat box. I never used one in the past, and I feel like an idiot now. Once you get the nuances of how to set it up for non-square situations, a router is sweet.
The fiberglass went in on the sole, so she's officially this shape for the rest of her life. 17oz 45/45 with an additional layer of 10oz woven that's much easier to fair. Much lighter and a little stronger than the 2408 roving that the old sole was tabbed in with.
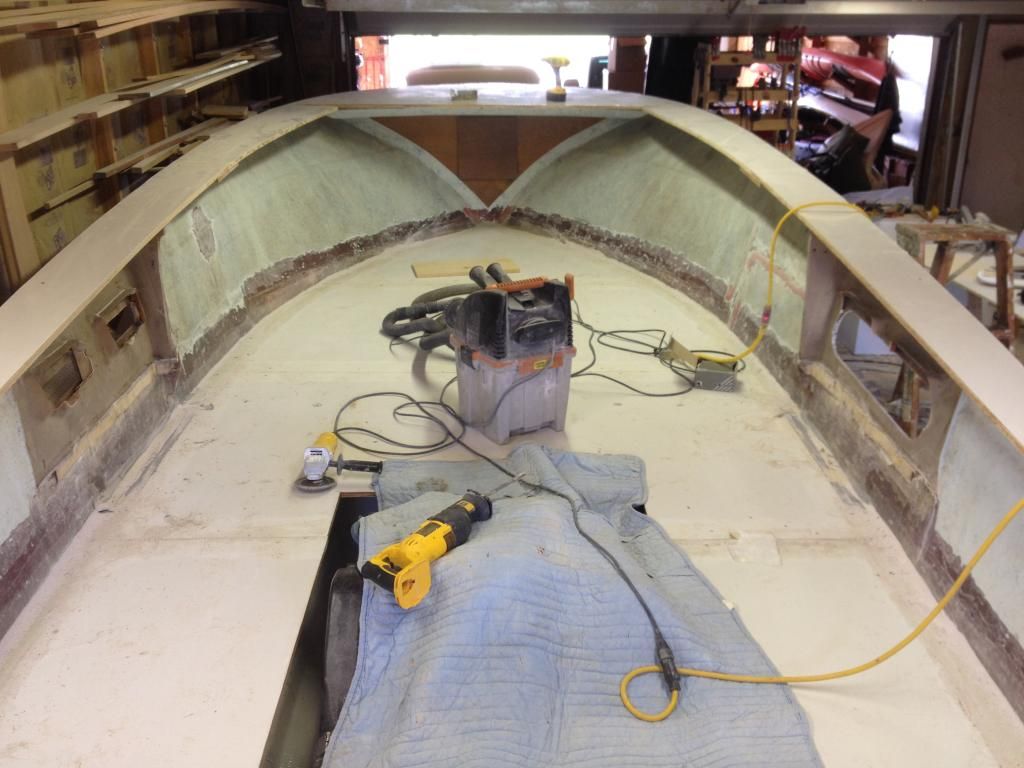
Also in the above photos, you can see the new deck blanks. Ended up fabbing all new fore, aft, and side decks rather than messing with repairing all the other junk. It was a hassle, and this will provide beefier decks regardless.
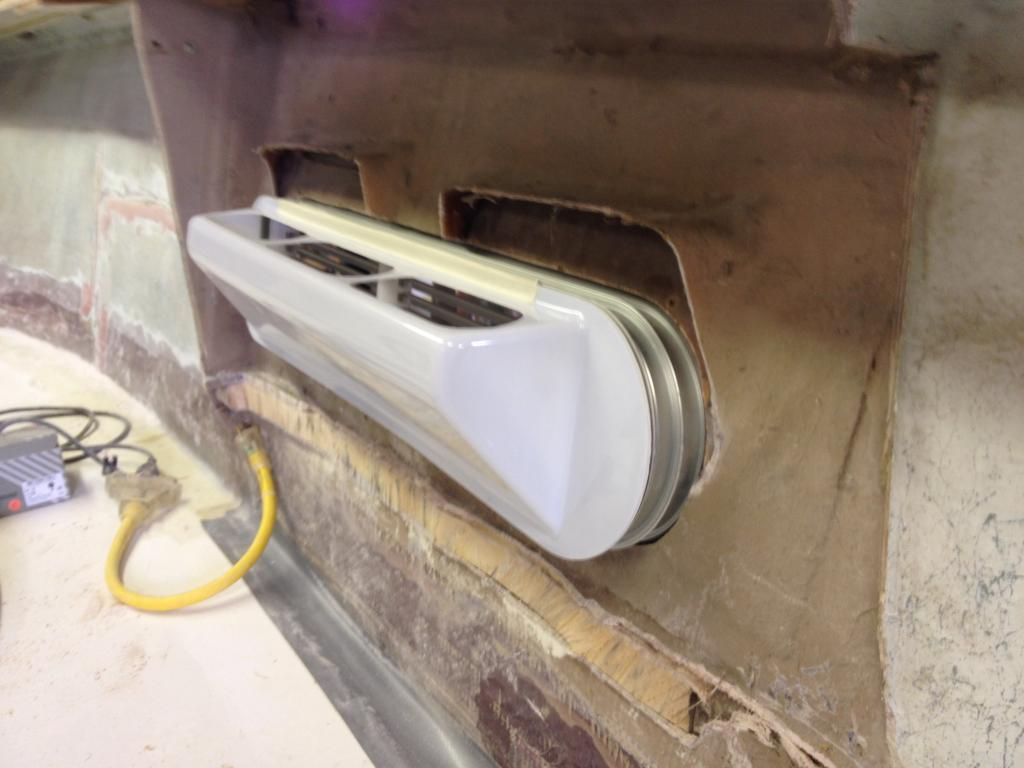
Next the engine room vents were placed temporarily to get a feel for the layout of the plenums inside. TONS of air will flow through these to keep the engine room cool, the interior quiet, and the 351 well fed with air. Oh, and they look bad ass
Vetus supplies a dorade box for the back of the vent to keep the water on the outside and the air flowing in. Picked those up, and mocked them in so we can get the plenums to fit without an interference problem.
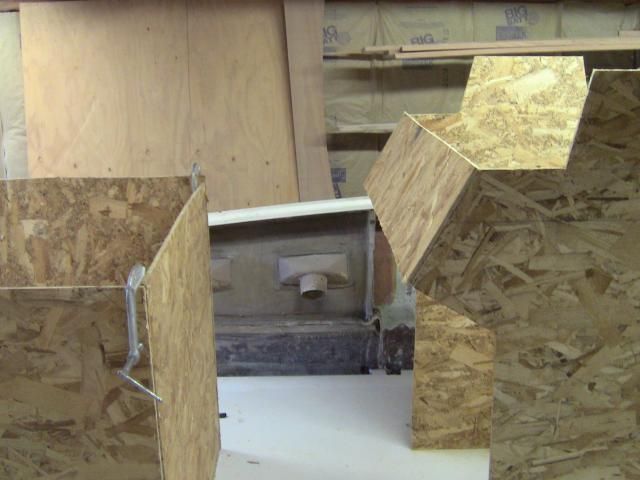
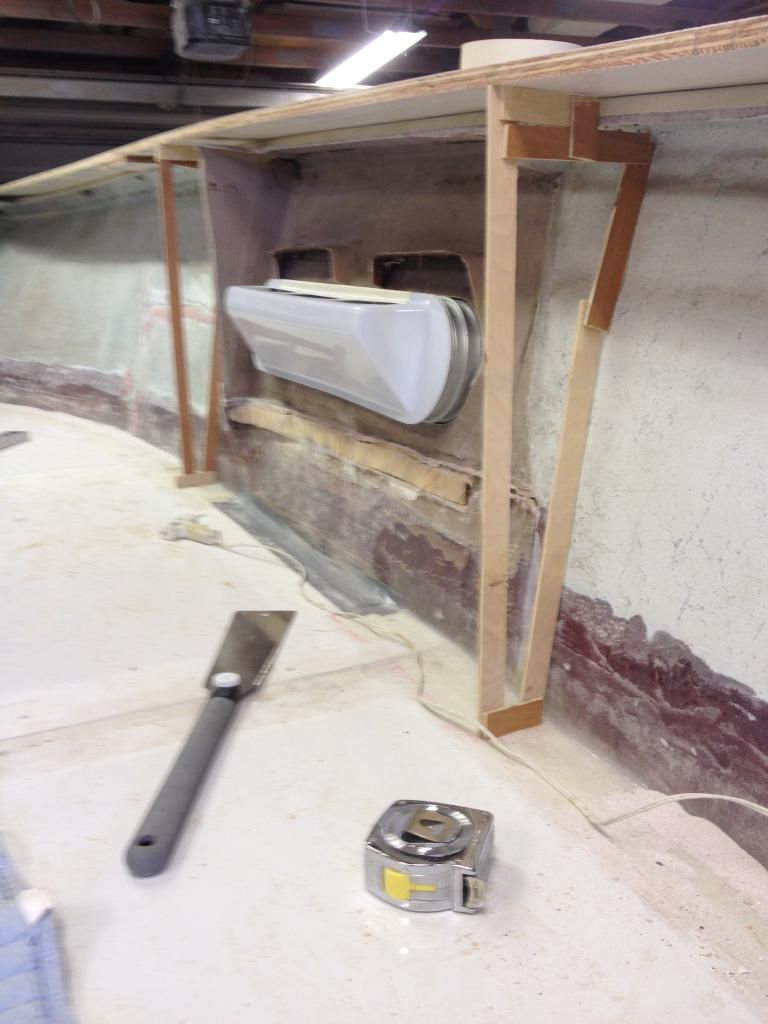
Next up it's arts and crafts day. Plywood sticks and hot glue make for fast pattern templates. Made up a set for the plenums and a set for the fuel fills and ballast drains. These will also stiffen the topsides and side decks, making her a much stiffer boat, yet again, than she was originally designed.
Obviously I've got a date with a grinder in my future. It's going to be unpleasant, but this should be the last major grinding session on the hull itself. I can smell the summer coming, and just might be able to take her out in a sea trial state, complete enough to survive the use, but not painted and finished. That's for next year.
E
#1: For those that say wood will rot in *well built* boats, and that stainless will die from crevice corrosion when glassed in place, you may now suck it:

That screw was buried in that 2x stock in 1963. It is still perfect metal, and nil rot for her age.
#2: I often get people asking how to cut smooth curves. Set your circular saw to just a hair deeper than the material, and you'd be shocked at how tight of a curve you can knock out. This is 3/4" thick stock, and wasn't even as tight as you can cut with this normal sized saw:

Okay, enough ranting.
Got out the router and shaped the seat box. I never used one in the past, and I feel like an idiot now. Once you get the nuances of how to set it up for non-square situations, a router is sweet.

The fiberglass went in on the sole, so she's officially this shape for the rest of her life. 17oz 45/45 with an additional layer of 10oz woven that's much easier to fair. Much lighter and a little stronger than the 2408 roving that the old sole was tabbed in with.


Also in the above photos, you can see the new deck blanks. Ended up fabbing all new fore, aft, and side decks rather than messing with repairing all the other junk. It was a hassle, and this will provide beefier decks regardless.
Next the engine room vents were placed temporarily to get a feel for the layout of the plenums inside. TONS of air will flow through these to keep the engine room cool, the interior quiet, and the 351 well fed with air. Oh, and they look bad ass

Vetus supplies a dorade box for the back of the vent to keep the water on the outside and the air flowing in. Picked those up, and mocked them in so we can get the plenums to fit without an interference problem.

Next up it's arts and crafts day. Plywood sticks and hot glue make for fast pattern templates. Made up a set for the plenums and a set for the fuel fills and ballast drains. These will also stiffen the topsides and side decks, making her a much stiffer boat, yet again, than she was originally designed.

Obviously I've got a date with a grinder in my future. It's going to be unpleasant, but this should be the last major grinding session on the hull itself. I can smell the summer coming, and just might be able to take her out in a sea trial state, complete enough to survive the use, but not painted and finished. That's for next year.
E
-
Bodofish
- Vice Admiral Three Stars
- Posts: 5407
- Joined: Sun Apr 29, 2007 12:59 pm
- Location: Woodinville
- Contact:
Re: Uniflite Salty Pup Refit
I don't know about anyone else, I'm just getting plain excited about seeing this baby in the water!!!!
Build a man a fire and he's warm for the night. Light a man on fire and he's warm the rest of his life!
-
Gisteppo
- Commodore
- Posts: 1016
- Joined: Fri Jun 22, 2007 11:26 am
- Location: Lake Spokane (Long)
- Contact:
Re: Uniflite Salty Pup Refit
Quickie update:
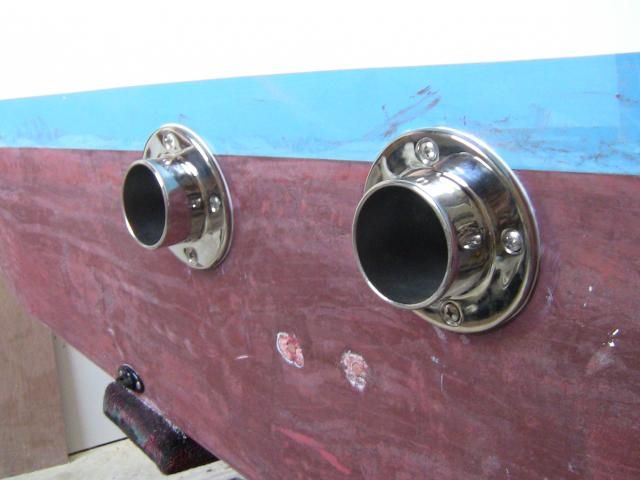
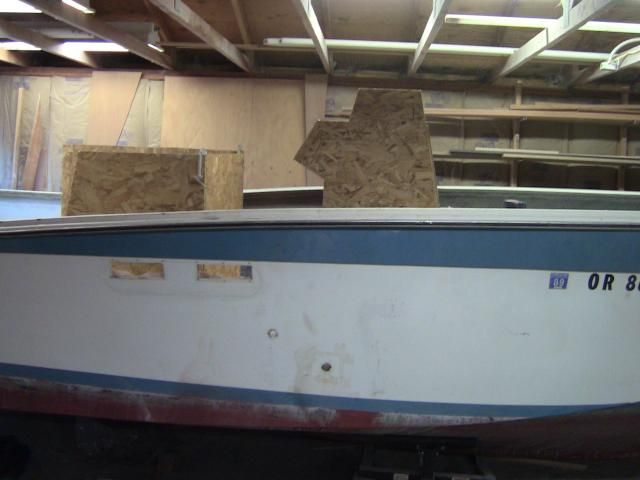
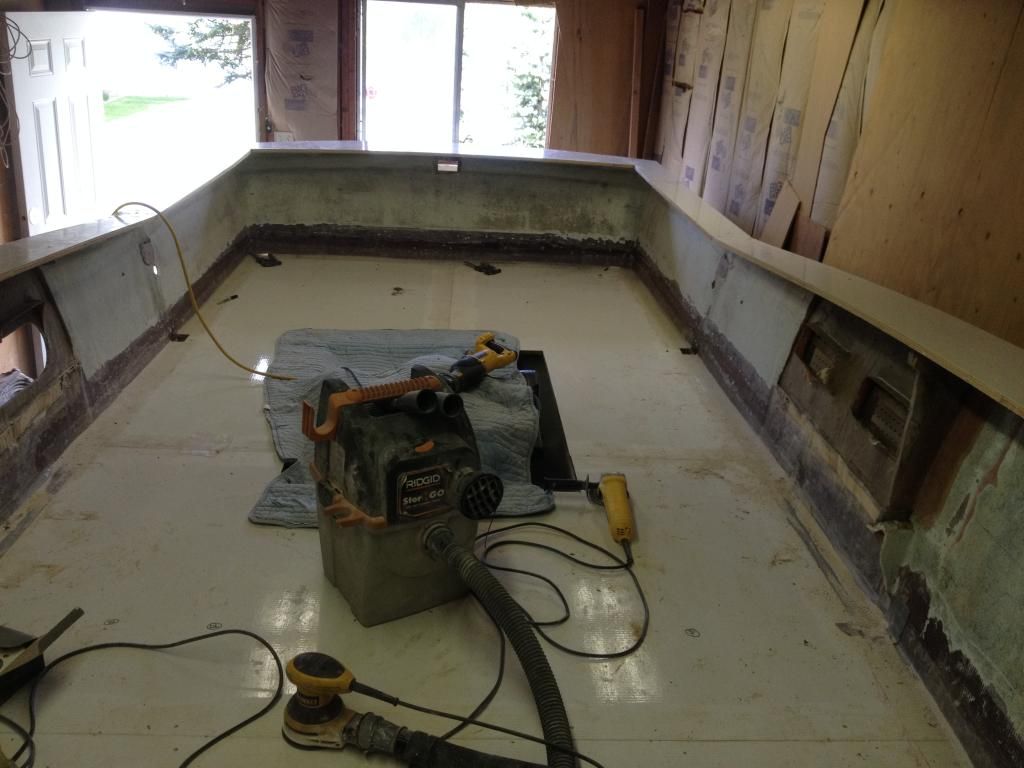
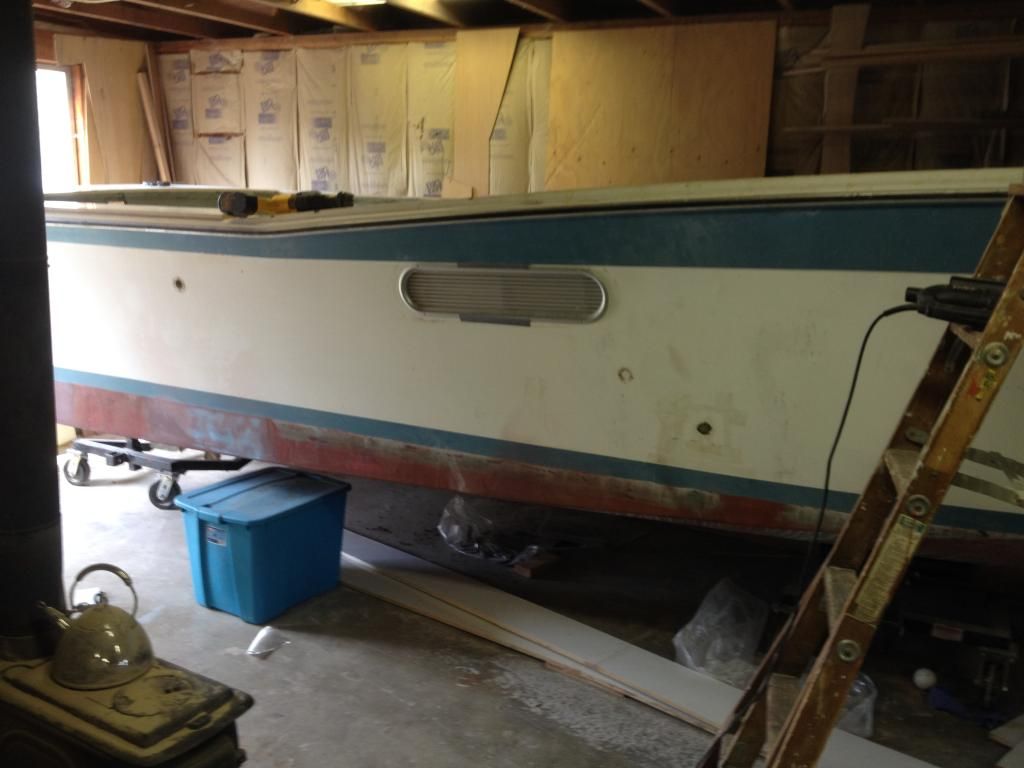
So I learned a funny thing about Uniflite. Apparently they had either two different people doing the venting on the hull sides, or one absolute d-bag that didn't care about accuracy. I made sure that the Vetus vents that were purchased would cover the span of the two vent holes, thus cutting them out as a single piece and getting the smallest (read: cheapest) vent that would do the job. They're obviously much larger than necessary for the 351, but that isn't a bad thing.
Turns out, on the port side, they're about 2" further apart...
So vent works great on one side, not so hot on the other. Thus, it's patch time. This seemed like a strange repair. Definitely don't want to grind out a huge area, lay in a big glass patch, fair, blah blah blah. Couldn't just make a blank and glass it in, because only a corner of it will remain, and if it breaks out, that's a pretty conspicuous spot to do it.
Option #C:
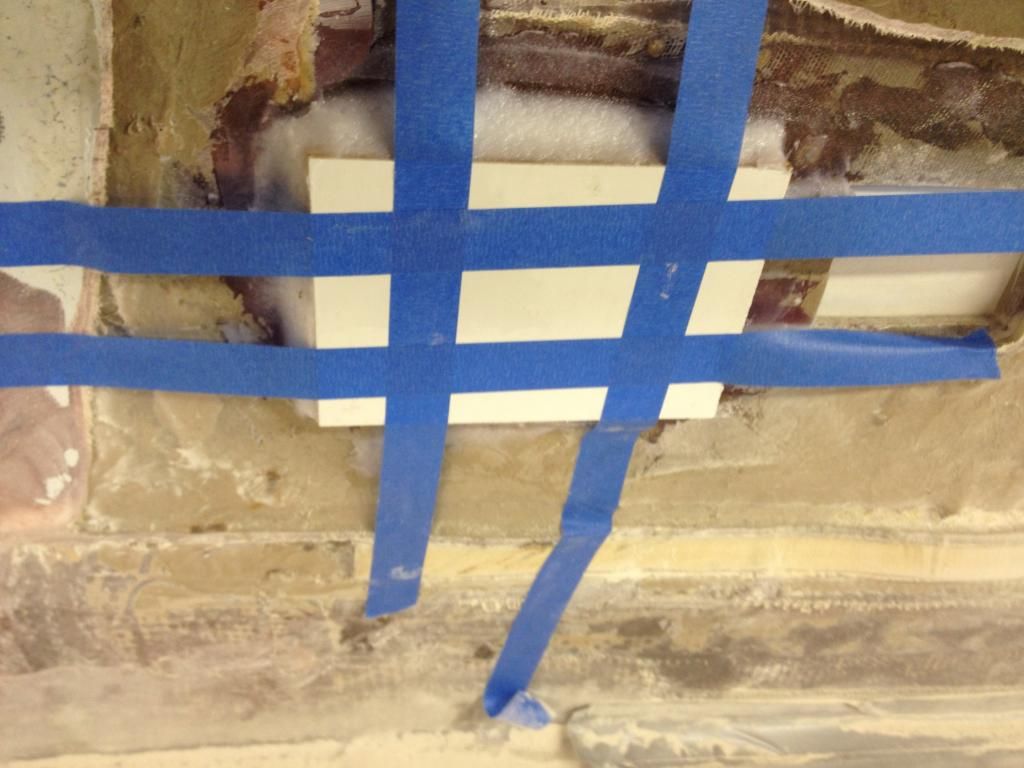
Big, fatty butt block that will get about 70% cut away when the vent hole gets opened up. There will be no interference with the vent, it'll be very strong, and I made a really flexible putty using cotton fibers and silica. Fillets to ease the stress of the block, and a backing plate to get it all smooth.
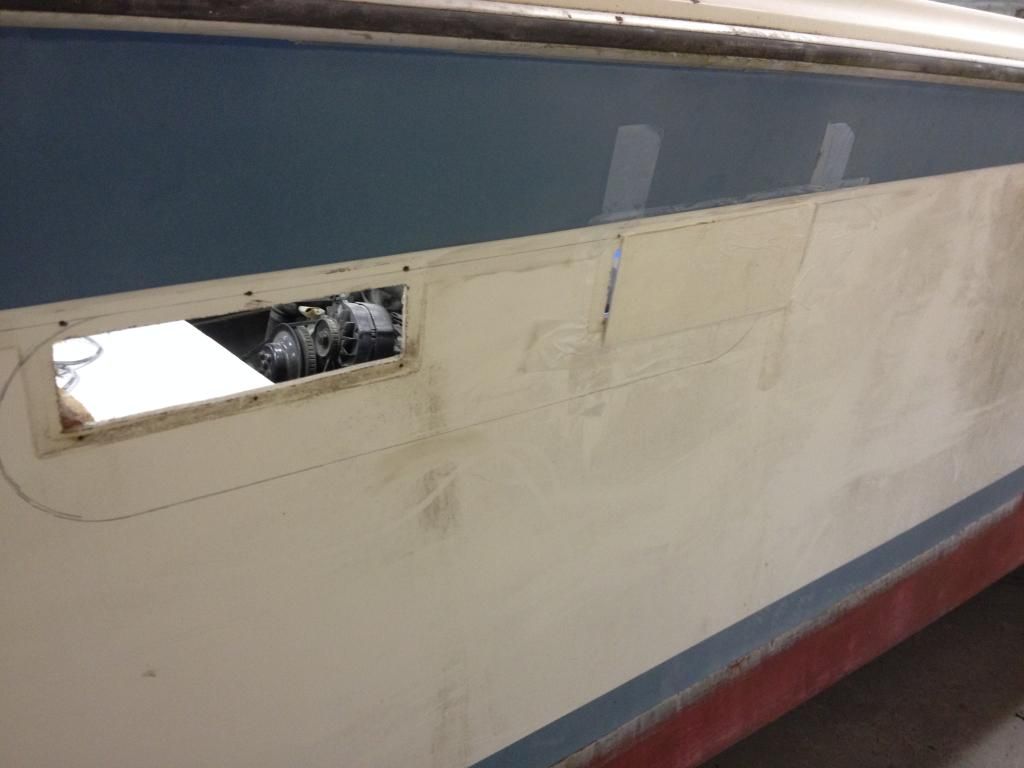
The piece I glued in was an offcut of the other hull side from the vent hole. This way it is identically finished, the shape was spot-on, like thickness, and should fair up really quickly.
Let cure, then we will see.
E
-
Bodofish
- Vice Admiral Three Stars
- Posts: 5407
- Joined: Sun Apr 29, 2007 12:59 pm
- Location: Woodinville
- Contact:
Re: Uniflite Salty Pup Refit
All I can say to your first statement is yes and yes. There's a very good chance that two different people put in the vents, one was probably done on Friday afternoon and other Monday. The bell rang = Drop your $h!t and head for the lockers......
Build a man a fire and he's warm for the night. Light a man on fire and he's warm the rest of his life!
-
Mike Carey

- Owner/Editor

- Posts: 7765
- Joined: Sun Apr 01, 2007 10:56 am
- Location: Redmond, WA
- Contact:
Re: Uniflite Salty Pup Refit
I'll second that!Bodofish wrote:I don't know about anyone else, I'm just getting plain excited about seeing this baby in the water!!!!

"Takers get the honey, Givers sing the blues".